BlueJ and its Configuration
The last update:
2016-07-21 – 01:56
Contents
In my books for beginners I use the development environment BlueJ,
because I consider it as the best teaching tool for the serious entrance
into the world of the object oriented programming.
Until now it is the only one development environment which allows – even in the beginner
courses – to think up firstly the program’s architecture in a simple class diagram
whereas the coding of the designed program is left for the integrated code generator.
Thus we may take care about the syntax only after the students have learnt and acquired
the basic architectonical constructions.
It is the environment, which immediately automatically projects all changes of the code into
the class diagram and vice versa all changes in the class diagram into the generated code.
Moreover, it is so simple that even the absolute beginners are able to learn
how to use it in a moment.
The BlueJ authors did not incorporate there all the functionalities,
which their environment is able to offer. Therefore I have prepared some modifications
with my students. These modifications better utilize the possibilities of
this development environment and meet the requirements of the methodology
Architecture First, according to which all my programming textbooks
are designed. Compared to the standard edition we added the following changes:
-
Only the UTF-8 code page is allowed in source files, which simplifies the transfers
among different operational systems with different localizations.
-
Coloring of particular types in the class diagram is extended in the following way:
-
Various kinds of data types are distinguished:
the standard class × the abstract class × the enum type × the interface.
-
The classes implementing certain design patterns are distinguished by colors
(The Library Class, The Singleton, The Crate).
-
The classes of special purposes are distinguished by colors
(The test class, the applet).
-
The context menus show not only the non-private methods,
but also the non-private attributes.
-
The references to local variables, instance variables and class (static) variables
in the object bench are distinguished by colors.
-
The variables of primitive data types are placed in the object bench as well.
-
The values of variables in the object bench can be changed.
-
The main extensions are connected with the interactive mode. Since now we can:
-
Define the test fixture and the test methods (till now it was the only possibility).
-
Define and/or delete the instance and class attributes (fields).
-
Define and/or delete the standard methods including the interface default methods.
-
Declare and/or delete the abstract methods in abstract classes and interfaces.
-
Define and/or delete the instance constructors including the possibility
to delegate the responsibility for the instance initialization to certain
previously defined constructor.
-
The BlueJ environment can be now directly integrated into NetBeans as its plugin.
If you would like to use the above described enhancements,
go on in the following way:
-
Firstly, install BlueJ for your operating system from the
http://bluej.org/.
Mind you install the version 3.1.6! The extension does not work with other versions.
During installation you should pay attention to install it into such folder in which the operating system
would enable to make the required changes, i.e. to replace certain existing files and add the new ones.
Do not forget to remember, where you have installed it!
-
Download the configuration file
BlueJPP_3.1.6.3.0526_2016-07-16.zip.
-
Now find the folder where you have installed the BlueJ.
The following steps differ according the used operating system.
-
If you use Windows or Linux, open the subfolder lib in the found folder.
-
If you use an Apple, it will be a little bit more complicated (however I expect,
that you have become accustomed to it during communicating with the non-apple rest of the world).
-
Find the BlueJ.app item in the folder,
in which you have installed the BlueJ.
-
Enter the command Show Package Contents (or its equivalent
in your localization) from its context menu.
-
Open the subfolder Resources of this folder
and its subfolder Java in it.
You can recognize that you have opened the proper folder according to the fact that
the files bluej.defs, bluej.jar and bluejcore.jar
are put there (among others).
-
Copy the content of the configuration file into this folder.
Several files will be replaced (among others the above mentioned ones)
and certain files and folders will be added.
Since this time BlueJ will be configured in the way as the text of the my textbooks assumes
and the appearance of all windows should correspond to the pictures in the book.
The localization of the configured BlueJ is set to the fictitious language English_RP,
which is the original English localization with modified source code templates
and some additional texts used in the enhancement.
If you want to install BlueJ as a NetBeans plugin, keep the following steps:
-
Configure the BlueJ IDE in the way described above in the section
Configuration
-
Run the NetBeans IDE and enter the Tools → Plugins command.
The Plugins dialog opens.
-
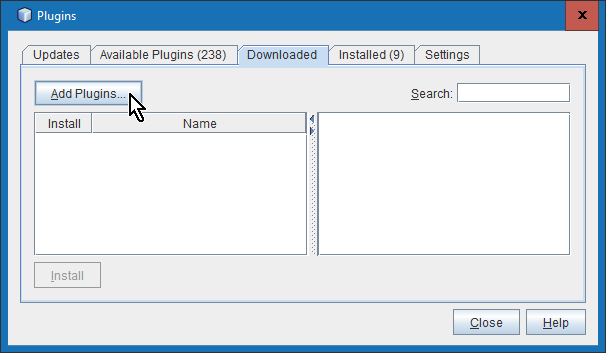
Press the Add Plugins button on the Downloaded card.
The Add Plugins file chooser dialog opens.
-
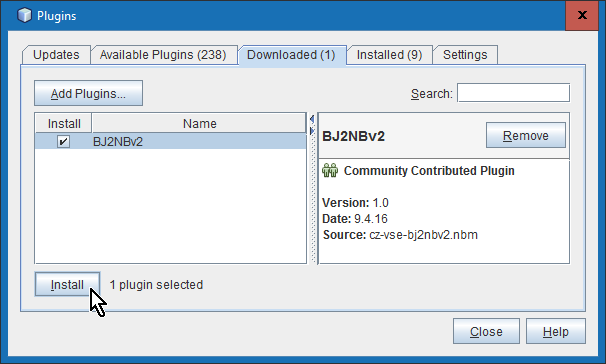
Find the folder to which you have copied the configuration files. Mark the
cz-vse-bj2nbv2.nbm file in it and press OK.
The information about the marked plugin appears.
-
Mark the plugin item and press Install to start the installation.
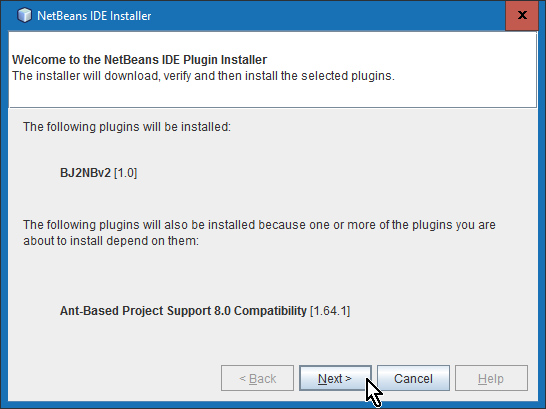
NetBeans firstly announce that another auxiliary plugin should be installed.
-
Confirm the system requests now as well as during the following installation.
At the end NetBeans explain that plugin will be working only after the restart
and ask, if you want to restart immediately or later on. If you postpone the restart,
the plugin will be working after the next NetBeans activation.
-
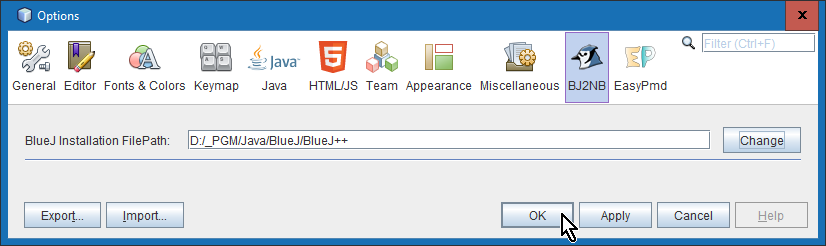
After installing the plugin and restarting the NetBeans enter the Tools → Options command.
The Options dialog with BJ2NB icon on its toolbar appears.
-
Click at this icon and enter the path to the BlueJ folder with configuration files
into the BlueJ Installation FilePath input field.
Then save this option by pressing OK and thus close the window.
Since this moment you can utilize all the BlueJ functionalities also in the NetBeans IDE.
This section is determined for answers to your most frequent questions.
If you meet any problem with the modification of the configuration
or if you have any question connected, please, send me an
e-mail with a subject starting BlueJ_Config_Question:.
If the question will deal with something more general,
the response will be published at this place.